14 minutes
RITSEC CTF 2026 - Reversing Writeups (Part 3): Buried Treasure
Introduction
Continuing my participation in RITSEC CTF 2026, this third part of the series focuses on another reversing challenge titled “Buried Treasure”. As with the previous writeups, this post documents the full process of analyzing the binary, understanding its internal logic and extracting the solution.
The name of the challenge already suggests something intentionally hidden rather than immediately visible, which typically hints at logic that is either obscured, layered, or embedded in an unusual part of the program flow.
Challenge Overview
The following description was provided as part of the challenge, along with a binary file named buried_treasure:
“I buried the flag pretty deep, can you dig it back up?”

As usual, I started by gathering some basic information about the binary using the file command:
$ file buried_treasure
buried_treasure: ELF 64-bit LSB executable, x86-64, version 1 (SYSV), statically linked, stripped
From this output, a few important characteristics can already be identified. The binary is a 64-bit ELF executable, but unlike the previous challenges, it is statically linked. This means all required library code is embedded directly into the binary, making it significantly larger and often more complex to analyze during reverse engineering.
Additionally, the binary is stripped, meaning symbol information has been removed. Combined with static linking, this results in a much noisier disassembly, where distinguishing between actual program logic and library code requires more effort and careful navigation during analysis.
Static analysis
With this in mind, I proceeded to load the binary into Ghidra to begin the static analysis phase. As expected, the binary proved to be quite painful to reverse. Being both statically linked and stripped, the disassembly contained a large number of functions, most of which were part of embedded library code rather than the actual program logic. This significantly increased the noise and made navigation slow and, at times, frustrating. The analysis ended up taking several hours and at some points I even switched to working on the fourth and final challenge in parallel whenever I felt burnt out. Despite this, after some time and a fair amount of manual cleanup and renaming, a few key functions started to stand out and helped clarify the overall direction of the challenge.
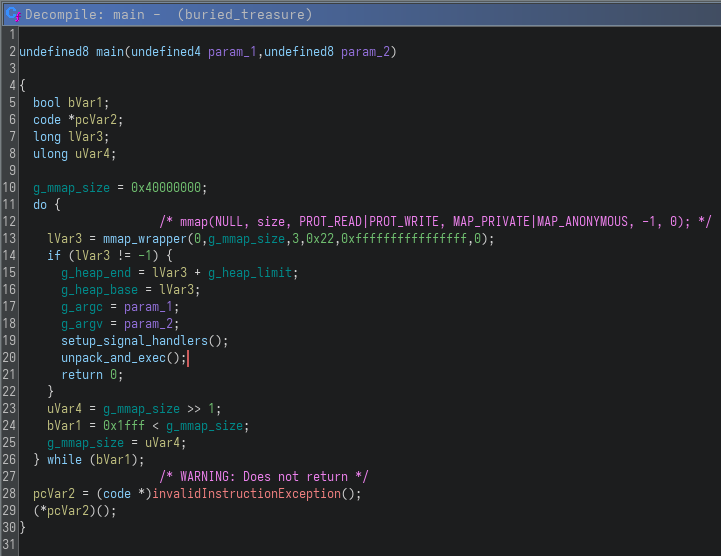
Starting from main, the program does not follow a typical structure. Instead of directly implementing logic, it first attempts to allocate a large memory region using mmap, progressively reducing the requested size until it succeeds. Once successful, it initializes some global state, sets up signal handlers and transfers execution to another function that I named unpack_and_exec. This already hints that the binary is likely acting as some form of loader or unpacker, rather than containing the flag logic directly:
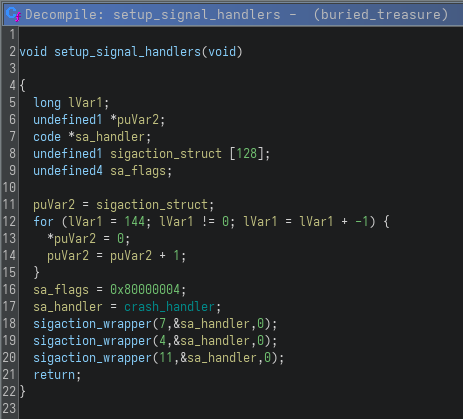
The setup_signal_handlers function registers a custom crash_handler for multiple signals (SIGBUS, SIGILL and SIGSEGV). While this can be used for general fault handling, I believe that in this context it also acts as an anti-debugging mechanism. These signals are commonly triggered during invalid memory accesses or execution faults, which can occur while debugging or modifying execution flow. By intercepting them and redirecting execution to a custom handler, the binary effectively sets up a tripwire that can detect and react to abnormal behavior, making analysis more difficult.
With that in place, the next step was to move deeper into the execution flow and analyze unpack_and_exec, which is where the binary starts doing something more meaningful. Although the function is quite large and initially looks overwhelming, most of it consists of setup code, argument handling and interactions with the runtime environment. After filtering out this noise, it becomes clear that this function is responsible for preparing and reconstructing the actual payload hidden inside the binary.
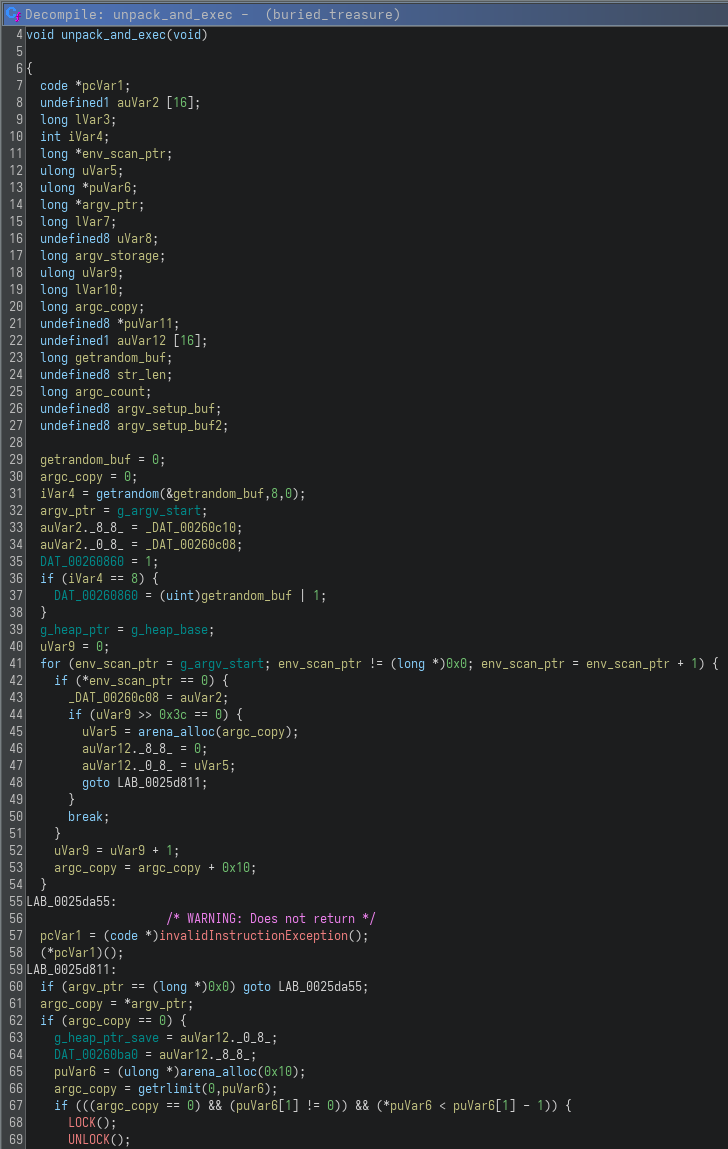
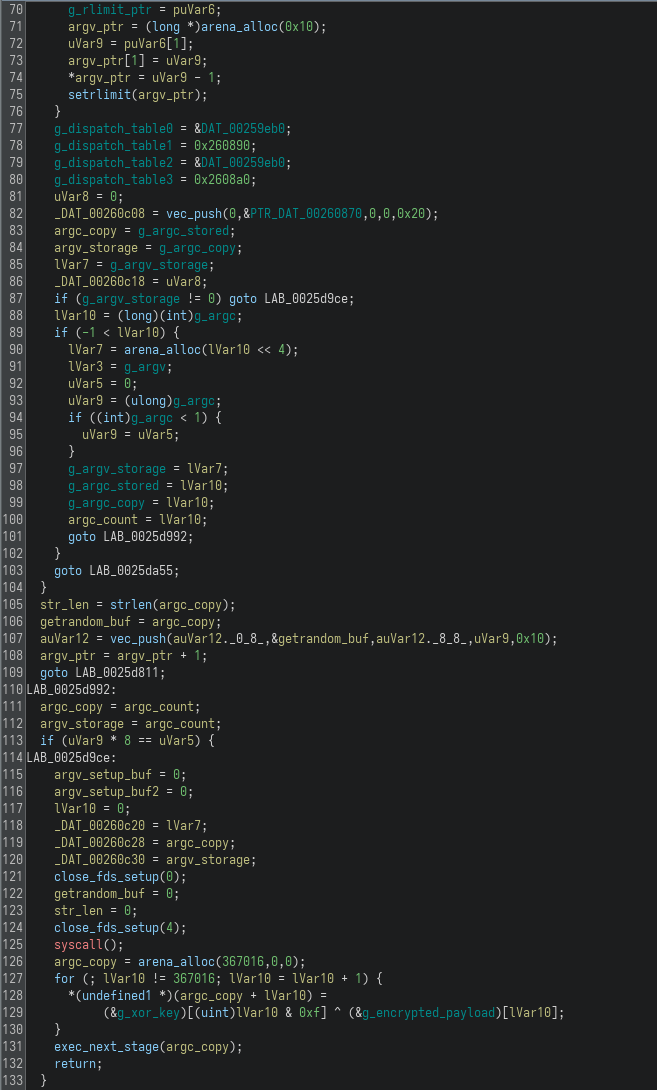
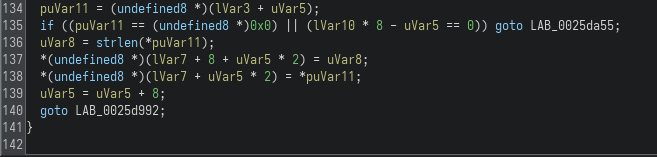
While the function spans several code paths, the most relevant part appears toward the end:
for (; lVar10 != 367016; lVar10 = lVar10 + 1) {
  *(undefined1 *)(argc_copy + lVar10) =
       (&g_xor_key)[(uint)lVar10 & 0xf] ^ (&g_encrypted_payload)[lVar10];
}
Here, a buffer is allocated and filled by XORing a static encrypted payload with a repeating key (g_xor_key). This is a classic unpacking technique, where the real program is stored in an encrypted form inside the binary and reconstructed at runtime. Once the decryption is complete, the resulting buffer is passed to exec_next_stage, which strongly suggests that this decrypted data is actually another executable:
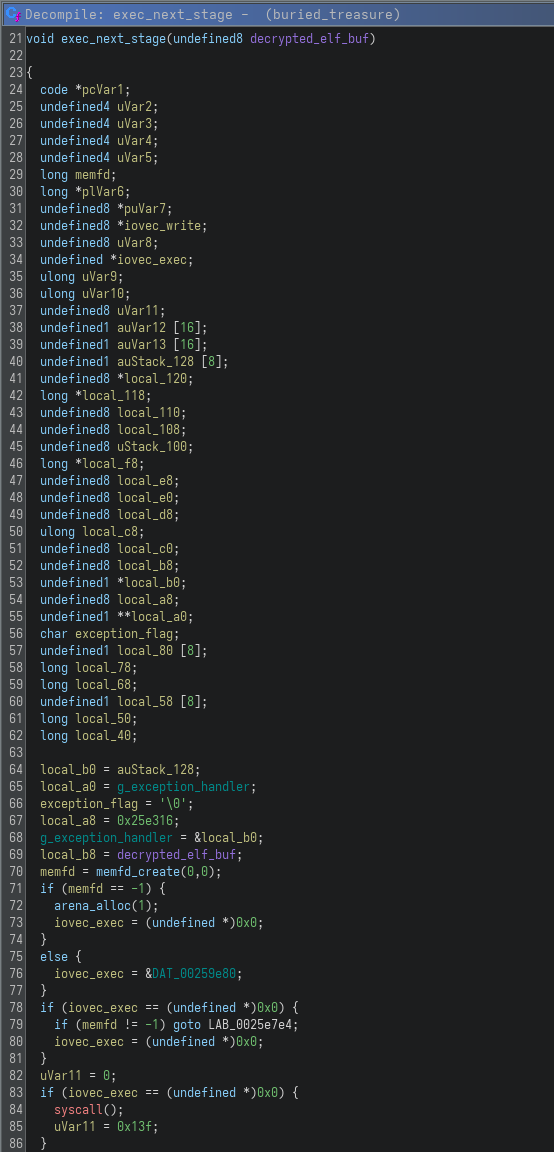
At this point, the overall structure of the challenge becomes clear: the provided binary is merely a loader, responsible for decrypting and executing a hidden second-stage ELF. The actual flag is not present in the original binary, but rather buried inside this encrypted payload.
Dynamic Analysis
Due to the nature of the binary, I proceeded with a dynamic analysis in parallel with static reversing in order to validate my understanding of its internal behavior and to uncover functionality that would not be visible from Ghidra alone. This was particularly important in this case, since the binary is stripped, statically linked and heavily relies on runtime reconstruction of its execution flow.
To get a first concrete view of what happens at runtime, I used strace while interacting with the program. This immediately revealed an unusual execution pattern that confirmed the presence of a staged loader mechanism:
$ strace ./buried_treasure <<< 'test' 2>&1 | grep -E "memfd_create|write|execve|read"
execve("./buried_treasure", ["./buried_treasure"], 0x7ffdcc49fdc0 /* 109 vars */) = 0
memfd_create("", MFD_CLOEXEC)           = 3
write(3, "\177ELF\2\1\1\0\0\0\0\0\0\0\0\0\2\0>\0\1\0\0\0\300x%\0\0\0\0\0"..., 367016) = 367016
execve("/proc/48715/fd/3", [], 0x7f4d26c5eec0 /* 109 vars */) = 0
memfd_create("", MFD_CLOEXEC)           = 3
write(3, "\177ELF\2\1\1\0\0\0\0\0\0\0\0\0\2\0>\0\1\0\0\00005%\0\0\0\0\0"..., 349888) = 349888
execve("/proc/48715/fd/3", [], 0x7fbe4a45ad70 /* 109 vars */) = 0
memfd_create("", MFD_CLOEXEC)           = 3
write(3, "\177ELF\2\1\1\0\0\0\0\0\0\0\0\0\2\0>\0\1\0\0\0\20\362$\0\0\0\0\0"..., 332536) = 332536
execve("/proc/48715/fd/3", [], 0x7f9347a56810 /* 109 vars */) = 0
memfd_create("", MFD_CLOEXEC)           = 3
write(3, "\177ELF\2\1\1\0\0\0\0\0\0\0\0\0\2\0>\0\1\0\0\0\200\256$\0\0\0\0\0"..., 315408) = 315408
execve("/proc/48715/fd/3", [], 0x7ff4b3a526c0 /* 109 vars */) = 0
memfd_create("", MFD_CLOEXEC)           = 3
write(3, "\177ELF\2\1\1\0\0\0\0\0\0\0\0\0\2\0>\0\1\0\0\0P\" \0\0\0\0\0"..., 298056) = 298056
execve("/proc/48715/fd/3", [], 0x7f7e7524e090 /* 109 vars */) = 0
memfd_create("", MFD_CLOEXEC)           = 3
write(3, "\177ELF\2\1\1\0\0\0\0\0\0\0\0\0\2\0>\0\1\0\0\0\330\23#\0\0\0\0\0"..., 210112) = 210112
execve("/proc/48715/fd/3", [], 0x7fce1aa7cea0 /* 109 vars */) = 0
memfd_create("", MFD_CLOEXEC)           = 3
write(3, "\177ELF\2\1\1\0\0\0\0\0\0\0\0\0\2\0>\0\1\0\0\0H\320\"\0\0\0\0\0"..., 192984) = 192984
execve("/proc/48715/fd/3", [], 0x7fd3c32347c0 /* 109 vars */) = 0
memfd_create("", MFD_CLOEXEC)           = 3
write(3, "\177ELF\2\1\1\0\0\0\0\0\0\0\0\0\2\0>\0\1\0\0\0(\215\"\0\0\0\0\0"..., 175632) = 175632
execve("/proc/48715/fd/3", [], 0x7fa0ade304c0 /* 109 vars */) = 0
memfd_create("", MFD_CLOEXEC)           = 3
write(3, "\177ELF\2\1\1\0\0\0\0\0\0\0\0\0\2\0>\0\1\0\0\0P\" \0\0\0\0\0"..., 158504) = 158504
execve("/proc/48715/fd/3", [], 0x7f7e4102c040 /* 109 vars */) = 0
memfd_create("", MFD_CLOEXEC)           = 3
write(3, "\177ELF\2\1\1\0\0\0\0\0\0\0\0\0\2\0>\0\1\0\0\0Xz!\0\0\0\0\0"..., 105448) = 105448
execve("/proc/48715/fd/3", [], 0x7f60fe841640 /* 109 vars */) = 0
memfd_create("", MFD_CLOEXEC)           = 3
write(3, "\177ELF\2\1\1\0\0\0\0\0\0\0\0\0\2\0>\0\1\0\0\087!\0\0\0\0\0"..., 88096) = 88096
execve("/proc/48715/fd/3", [], 0x7fee2281ac60 /* 109 vars */) = 0
memfd_create("", MFD_CLOEXEC)           = 3
write(3, "\177ELF\2\1\1\0\0\0\0\0\0\0\0\0\2\0>\0\1\0\0\0\250\363 \0\0\0\0\0"..., 70968) = 70968
execve("/proc/48715/fd/3", [], 0x7f8ef8416980 /* 109 vars */) = 0
memfd_create("", MFD_CLOEXEC)           = 3
write(3, "\177ELF\2\1\1\0\0\0\0\0\0\0\0\0\2\0>\0\1\0\0\0P\" \0\0\0\0\0"..., 53616) = 53616
execve("/proc/48715/fd/3", [], 0x7fa40d2128f0 /* 109 vars */) = 0
memfd_create("", MFD_CLOEXEC)           = 3
write(3, "\177ELF\2\1\1\0\0\0\0\0\0\0\0\0\2\0>\0\1\0\0\0\270G \0\0\0\0\0"..., 26784) = 26784
execve("/proc/48715/fd/3", [], 0x7fd6cb814ad0 /* 109 vars */) = 0
memfd_create("", MFD_CLOEXEC)           = 3
write(3, "\177ELF\2\1\1\0\0\0\0\0\0\0\0\0\2\0>\0\1\0\0\0\350\33 \0\0\0\0\0"..., 9656) = 9656
execve("/proc/48715/fd/3", [], 0x7fc220007c70 /* 109 vars */) = 0
write(1, "enter the flag: ", 16enter the flag: )        = 16
read(0, "test\n", 64)                   = 5
write(1, "no :(\n", 6no :(
What immediately stands out from the trace is the repeated sequence of memfd_create, write and execve("/proc/self/fd/3"). Each iteration creates an in-memory file descriptor, writes a full ELF binary into it and then executes it directly from the /proc filesystem. This confirms that the program never relies on disk-backed files for its intermediate stages, instead reconstructing and executing everything entirely in memory.
Another interesting observation is that this pattern repeats multiple times with decreasing write sizes, suggesting that each stage is generating a smaller or more refined version of the next payload. This strongly indicates a chained unpacking or staged decryption process, where each executed ELF is responsible for producing the next one.
With this runtime behavior confirmed, the next step was to move beyond system call tracing and analyze how these stages evolve internally during execution, in order to understand how control flows from one in-memory binary to the next.
Unpacking the Final Payload
After confirming that the binary operates as a multi-stage in-memory loader, the next logical step was to extract the actual payload being executed in the final stage. Since none of these intermediate binaries are ever written to disk, static extraction is not an option, so I turned to dynamic instrumentation using gdb to intercept the moment each stage is materialized in memory.
To achieve this, I used the following gdb script:
$ gdb --nx --nh -q ./buried_treasure << 'EOF'
set follow-exec-mode same
set pagination off
catch syscall write
condition 1 $rdi == 3
commands 1
  set $magic = *(int*)$rsi
  if $magic == 0x464c457f
    append binary memory /tmp/last_stage.elf $rsi $rsi+$rdx
    printf "Dumped %d bytes\n", $rdx
  end
  continue
end
run <<< "AAAA"
EOF
....
Catchpoint 1 (call to syscall write), 0x0000000000204db0 in ?? ()
Dumped 26784 bytes

Catchpoint 1 (returned from syscall write), 0x0000000000204db0 in ?? ()
Dumped 26784 bytes
process 63148 is executing new program: /proc/63148/exe

Catchpoint 1 (call to syscall write), 0x000000000020707a in ?? ()
Dumped 9656 bytes

Catchpoint 1 (returned from syscall write), 0x000000000020707a in ?? ()
Dumped 9656 bytes
process 63148 is executing new program: /proc/63148/exe
enter the flag: no :(
[Inferior 1 (process 63148) exited with code 01]
(gdb) %
The idea here is to hook into the exact moment where the binary writes a new ELF payload into memory, just before it gets executed. This is done using catch syscall write, which instructs gdb to break every time the write system call is invoked. Since earlier observations from strace showed that all payloads are written to a file descriptor returned by memfd_create, I added a condition ($rdi == 3) to only trigger when the write is targeting that specific descriptor.
Inside the breakpoint commands, the script inspects the buffer being written ($rsi) and checks for the ELF magic value 0x464c457f (\x7fELF). This ensures that only actual ELF payloads are captured, avoiding unrelated writes. When a match is found, the corresponding memory region is dumped directly to disk using append binary memory, reconstructing the in-memory executable into /tmp/last_stage.elf.
The use of set follow-exec-mode same is also important here, as it ensures that gdb continues tracing execution even after each execve call. Without this, the debugger would lose track of the process as it transitions between stages.
In essence, this approach leverages the program’s own behavior against it: instead of trying to reverse every stage manually, it simply captures the reconstructed payload at runtime, allowing us to obtain the final executable that contains the actual flag logic.
With the final stage successfully dumped, the next step was to analyze its behavior in isolation. Since this payload is now a standalone ELF, it can be treated like a normal binary, which makes debugging significantly more manageable compared to the multi-stage loader.
To begin exploring it, I used the following gdb script:
$ gdb --nx --nh -q /tmp/last_stage.elf << 'EOF'
set follow-exec-mode same
catch syscall read
run <<< "AAAAAAAAAAAAAAAAAAAAAAAAAAAAAAAAAA"
finish
x/80i $pc
x/80gx 0x200168
EOF
Here, the goal was to observe how the binary processes user input and to quickly reach the code that operates on it. By setting a breakpoint on the read syscall, execution stops as soon as the program attempts to read input from stdin. After providing a controlled input, the finish command allows execution to return from the syscall handler back into the program’s logic, effectively placing us right after input has been read and is about to be processed.
From there, x/80i $pc disassembles the next instructions at the current program counter, giving a clear view of how the input is handled. Additionally, examining memory at a specific address (x/80gx 0x200168) helped identify nearby data structures or constants that might be involved in validation or transformation logic.
This approach provides a quick way to anchor the analysis at a meaningful execution point, avoiding the need to manually step through initialization code and allowing focus on the parts of the binary that directly interact with user-controlled data.
After inspecting the disassembly around the input handling logic, the core validation mechanism becomes much clearer. The relevant instructions are:
0x203005:    cmp    $0x24,%rcx               ; flag length must be 0x24 = 36
0x203009:    jne    0x203014
...
0x203025:    push   $0xd
0x203027:    pop    %r13
0x203029:    cmp    $0x4a,%r12
0x20302d:    je     0x203099
0x20302f:    movzbl -0x26(%r14,%r12,1),%eax  ; load input[r12 - 0x26]
0x203035:    imul   %r13,%rax                ; multiply by r13
0x203039:    add    %r12,%rax                ; add r12
0x20303c:    cmp    0x200168(,%r12,8),%rax   ; compare with table[r12]
The first important detail is the length check: cmp $0x24, %rcx enforces that the input must be exactly 0x24 bytes long, which corresponds to 36 characters! This already gave a strong constraint on the expected flag format.
The main validation logic happens in the loop that follows. For each character position, the binary loads a byte from the user input, performs a simple arithmetic transformation and compares the result against a value stored in a table located at 0x200168. Breaking this down:
- A character is loaded from the input buffer.
- It is multiplied by the value stored in
r13(which is0xD, or13). - The current index (
r12) is added. - The result is compared against a precomputed value from the table.
In simplified form, the validation condition for each character becomes:
input[i] * 13 + i == table[i]
This is a straightforward linear relation, which is great news from a reversing perspective. Instead of brute forcing or emulating the binary, we can directly invert the equation and recover each character independently:
input[i] = (table[i] - i) / 13
At this point, the only missing piece is understanding where exactly these table[i] values reside in memory. Looking back at the comparison instruction (cmp 0x200168(,%r12,8), %rax), we know that the table base is at 0x200168, with each entry being 8 bytes wide. However, as discussed earlier, the indexing does not start from zero. The register r12 begins at 0x26 and increases by one per iteration, while the input is accessed using an offset of -0x26. This effectively aligns the input index i with r12 - 0x26.
As a result, the first relevant table entry is not at 0x200168, but at:
0x200168 + 0x26 * 8 = 0x200298
This is where the comparison for input[0] takes place, and the following 35 entries correspond to the rest of the flag characters. With this in mind, I used gdb to dump exactly these 36 entries directly from memory:
$ gdb --nx --nh -q /tmp/last_stage << 'EOF'
set pagination off
set follow-exec-mode same
catch syscall read
run <<< "AAAAAAAAAAAAAAAAAAAAAAAAAAAAAAAAAA"
finish
x/36gx 0x200298
EOF
....
Catchpoint 1 (returned from syscall read), 0x0000000000202fb9 in ?? ()
(gdb) 0x200298: 0x0000000000000450      0x0000000000000895
0x2002a8:       0x00000000000012e5      0x00000000000009e9
0x2002b8:       0x0000000000001b55      0x0000000000001003
0x2002c8:       0x0000000000002b2f      0x00000000000026c5
0x2002d8:       0x000000000000302b      0x000000000000306d
0x2002e8:       0x00000000000040fc      0x0000000000003f91
0x2002f8:       0x000000000000208b      0x0000000000004e67
0x200308:       0x00000000000051b5      0x0000000000004d65
0x200318:       0x000000000000645a      0x0000000000005f47
0x200328:       0x0000000000003264      0x0000000000003815
0x200338:       0x0000000000007add      0x0000000000006a5d
0x200348:       0x0000000000003bcd      0x000000000000864d
0x200358:       0x0000000000003d2e      0x0000000000009ab9
0x200368:       0x0000000000008d79      0x0000000000009421
0x200378:       0x0000000000008c29      0x000000000000a4cb
0x200388:       0x0000000000005220      0x000000000000c4e5
0x200398:       0x00000000000055bd      0x000000000000c51b
0x2003a8:       0x000000000000ccad      0x000000000000e4cd
....
This script breaks on the read syscall, feeds controlled input and then resumes execution until the program returns to its main logic. At that point, the table is already initialized in memory, allowing me to safely dump all required values in one go. Once the table is extracted, applying the formula input[i] = (table[i] - i) / 13 for each position directly yields the flag, without needing to further interact with or emulate the binary.
Getting the flag
With the table values successfully extracted and the validation logic fully understood, recovering the flag becomes a straightforward task. Since each character satisfies a simple linear relation, I directly inverted the formula and reconstruct the flag one byte at a time.
To automate this process, I used the following Python script:
#!/usr/bin/env python3

table = [
    0x450,  0x895,  0x12e5, 0x9e9,  0x1b55, 0x1003,
    0x2b2f, 0x26c5, 0x302b, 0x306d, 0x40fc, 0x3f91,
    0x208b, 0x4e67, 0x51b5, 0x4d65, 0x645a, 0x5f47,
    0x3264, 0x3815, 0x7add, 0x6a5d, 0x3bcd, 0x864d,
    0x3d2e, 0x9ab9, 0x8d79, 0x9421, 0x8c29, 0xa4cb,
    0x5220, 0xc4e5, 0x55bd, 0xc51b, 0xccad, 0xe4cd,
]

flag = []
r12, r13 = 0x26, 0xd

for entry in table:
    char_val = (entry - r12) // r13
    flag.append(chr(char_val))
    r12 += 1
    r13 += 0xd

print(''.join(flag))
The script mirrors the logic observed in the binary. For each table entry, it applies the inverted formula to recover the original character. The variables r12 and r13 are initialized to match their runtime values in the assembly and are updated per iteration, ensuring the computation stays aligned with the original validation loop.
Once executed, the script reconstructs the full flag instantly, avoiding the need for further debugging or interaction with the binary:
$ python solve.py
RS{0k4y_i_th1nk_th47s_3n0ugh_l4y3rs}
Conclusion
This challenge was a great example of how combining static and dynamic analysis is often necessary when dealing with heavily obfuscated binaries. The stripped and statically linked nature of the executable made initial analysis noisy and time-consuming, while the multi-stage in-memory execution model ensured that the real logic was never directly visible in a single place.
What made the difference here was shifting perspective early on. Instead of trying to fully reverse every stage statically, leveraging dynamic analysis tools like strace and gdb allowed me to observe how the binary behaved at runtime, extract the final payload and focus only on the relevant logic. This significantly reduced the complexity of the problem.
Another interesting takeaway is how simple the core validation actually was. Despite the layers of unpacking and execution indirection, the flag check ultimately boiled down to a basic linear equation. This contrast between heavy obfuscation and simple underlying logic is something that appears quite often in CTF challenges.
Overall, this was one of the more time-consuming challenges in the set, but also one of the most rewarding. It reinforced the importance of adapting your approach when static analysis becomes inefficient and it highlighted how powerful runtime instrumentation can be when dealing with staged or self-unpacking binaries.